
Deploying a Hugo static site with Gitlab and Cloudflare
Assumptions:
- existing git repo with a Hugo site
For this post I will be using the [Hugo example site](https://github.com/gohugoio/hugoBasicExample][Hugo example site) for demo purposes.
When deploying a static website on the modern web there are many requirements that may restrict the number of choices we have. The reason I chose Gitlab and Cloudflare is because it is one of two ways (as of 03/23/2018) that I know off that satisfies these requirements.
- custom domain :: for example chrisostrouchov.com
- ssl certificate :: must have an ssl certificate for the custom domain
- continuous delivery (CD) :: upon a git commit I expect my updated blog to be deployed
- private git repo :: it would be nice to have private repo for the development while having a public static site
- content delivery network (CDN) :: ensures that the site is served to a client as fast as possible
- free :: everything for deployment must be free
Gitlab is really the only option as of now that provides a private git repo, continuous delivery, and is free. Personally I love gitlab and for a while I even self hosted it on Kubernetes. It cannot be understated how fast Gitlab has grown and their CD/Continuous Integration(CI) platform is unmatched. Github satisfies continuous delivery and is free but only for public git repos.
Cloudflare and Netlify are the two options that satisfy ssl certificate, content delivery network, and custom domain. Note that if you self hosted your custom domain you still would not get the benefits of a CDN and would need to use a provider such as Cloudflare. Cloudfalre provides many other additional features such as HTTP/2 push, rate limiting, free DDos protection which are beneficial no matter where you are hosting your site. I would advise people trying to learn proper development practices to not use Netlify. Netlify is a great services and is definitely easier to setup than Cloudflare but it hides the standard deployment process. If you would like to setup a static site instead with Netlify I would recommend this [getting started guide](https://www.netlify.com/docs/#getting-started][getting started guide).
Now that I have talked about the reasoning behind the services that we will use lets get to deploying a static website! All of the code can be found in a gitlab repo here.
First we will need to create a gitlab account and push our git repo to
gitlab. Gitlab provides documentation on how to get this done. We will
next be taking advantage of Gitlab’s CD/CI pipeline. Our usage of
CD/CI will be very limited but know that much more complex pipelines
with dependencies can be constructed. Gitlab checks for a file
.gitlab-ci.yml in the root of the git repo and executes the build
steps provided. One of the features that Gitlab provides is static
website hosting with a default path of
<username>.gitlab.io/<repo>/. Gitlab brands this as =pages= with
much of the same features as Github pages.
|
|
We only have one step in this build pipeline. The step is named
pages which is required for Gitlab to know that a static site should
be given for the repo. Gitlab uses runners based on a docker image for
each build step. For this build step we are using the docker image
registry.gitlab.com/pages/hugo:0.32.3. The docker images will run
the hugo command. The hugo command by default builds the site and
puts all static files in the public directory. Conveniently Gitlab
pages requires an archived public directory to serve the static
site. When you have pushed the .gitlab-ci.yml to your master branch
on Gitlab you should see a blue icon indicating that it is building
your site. If you have included themes via git submodules (the
recommended hugo way) then you need to include the
GIT_SUBMODULE_STRATEGY.

After the simple pipeline has completed you will hopefully see the blue icon change to a green checkmark. You can check the site that will be exposed by looking at the build artifact created and downloading it.
Now that we have a simple website deployed we need to use Cloudflare to setup the CDN and TLS. These next steps follow these directions from Gitlab. Some steps were not well documented an I will to clarify.
- create a Cloudflare account
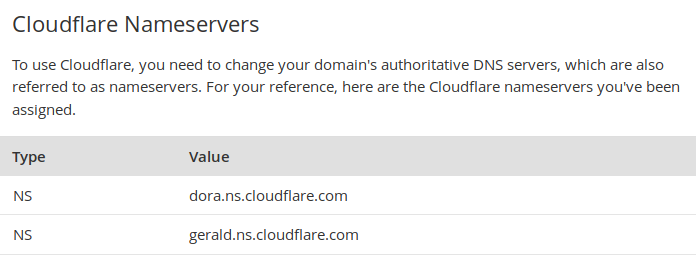
- point your nameservers for your domain to cloudflare. My example ones are listed bellow.
Once you have completed these steps you can continue to follow the guide. At this point you will have a custom domain for your hugo site!
The site for this demo is https://hugotest.chrisostrouchov.com and the gitlab pages url is https://costrouc.gitlab.io/hugo-example-site. All of the source code is available at the gitlab repo.